How to Login #
- Click the Genesys Icon on your desktop or go to https://apps.use2.us-gov-pure.cloud/ in Chrome if you do not have the desktop icon.
-
- Supervisors must put in an OHD ticket to have the Genesys icon loaded to your computer.
- Once you get the icon, you should take calls out of that instead of through your internet browser.
-
- At the select region page, change your region to FedRAMP.

- When you get to the login page, click more login options.
- Enter SOMODSSFSDFR in the box and click Next.
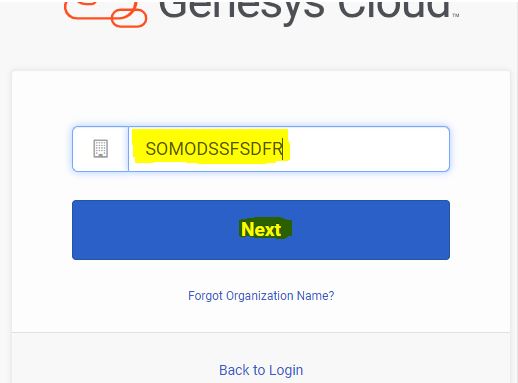
- Then click Okta.
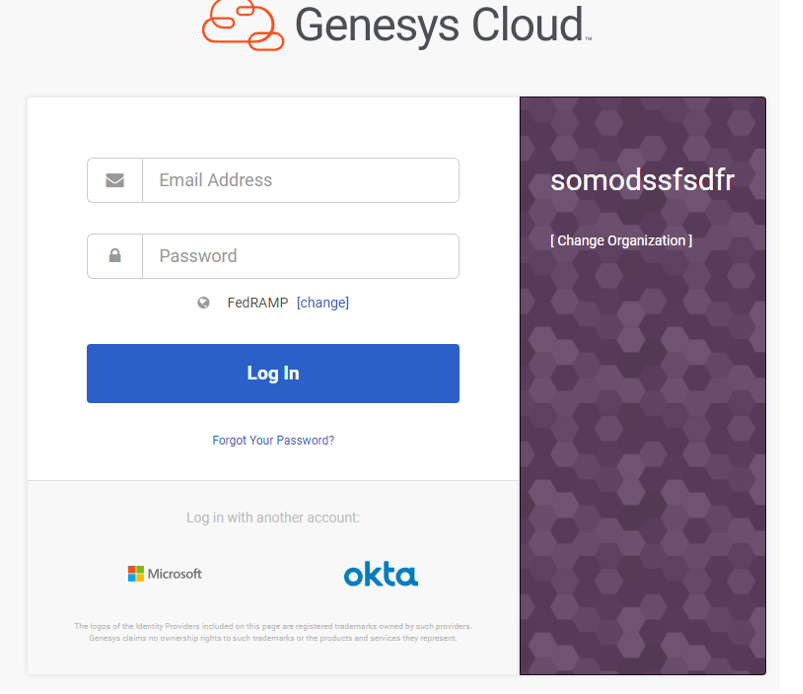
- After the initial login process has been completed, future logins should only require clicking on OKTA.
Note: There may be times, such as clearing browser or computer updates, when the whole process will need to be repeated to login.
Assigning a Queue #
Assigning a Queue to a Single Team Member
- Click Admin

- Under People and Permissions, click People

- Find a user using search or by paging through the list

- Click More : and from the menu that appears, click Edit Person
- Click the Queues tab
![]()
- Under Assigned, check the box next to the queue you want to assign.
- Repeat steps 6 for each additional queue to add
- Click Save
Assigning Queues to Multiple Team Members at a Time
- Admin
- People
- Click the checkmark box next to each person’s name you want to reskill
-
- In the Search bar, you can change the Search drop down box to “reports to” and type in your name. This will pull up everyone assigned to you in Genesys. If the list is not right, please email Tennille Nelson, Kia Wright and Heather Zimmerman.
-
- Click More Actions
- Click Assign Queues (The Manage Queues pane will open)
- Click the gray X next to Queues
- Search for the queue to assign and select it
- See step 10 for if you need to check Remove Existing Queues or not
- Click Save
- If you have the “Remove existing queues” box checked a message informs you that, if not selected, Genesys Cloud removes the previously assigned queues. If that box is not checked, their previously assigned queues are NOT removed.
-
-
- EX: Worker is assigned to Tier 1
-
- Supervisor follows steps above and chooses Tier 3 as the queue
- Supervisor does NOT check the “remove existing queues” box
- Worker is now assigned to both Tier 1 and Tier 3 (This is not a combination of queue assignments a worker should have. See Queue Assignment Combinations for more information.)
-
- EX: Worker is assigned to Tier 1
- EX: Worker is assigned to Tier 1
-
-
-
-
-
- Supervisor follows steps above and chooses Tier 3 as the queue
- Supervisor DOES check the “remove existing queues” box
- Worker is now assigned to Tier 3 only.
-
-
-
Queue Assignment Combinations #
Some queues are set up to have a higher priority than others when staff are assigned to more than one queue.
When staff are assigned to tier 3 and tier 3 outbound, tier 3 outbound has the higher priority. This means if there is a call waiting in tier 3 outbound it will get answered before a call in tier 3 queue, no matter how long the tier 3 queue call has been waiting.
When staff are assigned to tier 1 and adult medical, adult medical has the higher priority.
Staff should not be assigned to all queues at the same time. They either need to be assigned to just one queue at a time OR they can be assigned to Tier 3 and Tier 3 Outbound OR Tier 1 and Adult Medical, unless otherwise directed. Supervisors will be directed on where to assign their staff management. The decision to assign or move staff around to different queues is based on business need.
Queue Monitoring #
- Go to Performance
- Click on Workspace

- Click Queues Activity on the left side of the screen

- Click on the Filter icon on the far right

- Choose “all” under Media Type. This will allow you to see the number of calls who have chosen to receive a call back and those who are physically waiting in the queue. The number with the phone icon and the arrow pointing left are the calls who have requested a call back. In the example below, there are 532 callers, 30 chats and 1 text waiting.

- On the far right of this dashboard is a plus sign where you can customize what you see/don’t see.
- The “Interactions” column is telling you how many team members are either on a call or in ACW. This includes supervisors.
- The “Interacting” column is telling you the number of staff who are on a call.
Detailed Queue Monitoring
- In Queues Activity you can view more details for a specific queue by clicking on the queue name. This opens up a list of team members and what their status is.
Is A Call Stuck?
- When a call is transferred from one tier to another incorrectly (See Did My Team Member Use External Contacts or Queues for more information). When this happens, a priority is not given to the call and the system will keep it on hold until either the caller abandons or an admin disconnects them. This can cause extra-long hold times to show up for that queue. To see if there is a stuck call:
- Go to Performance
- Click Workspace
- On the left click on Queues Activity
- Click on the Tier name
- The first box on the left shows the calls in queue, the skills assigned to those calls and how long the call has been holding (duration)
- Click on Duration so the arrow next to it is pointed down

- Scroll through to the very bottom
- If there is a call there with no skill, it’s a stuck call. Supervisors cannot disconnect these calls, only an admin can. If you see a stuck call you should email Tennille Nelson, Richard (Matt) Hampton, Rylea Less, Kia Wright or Heather Zimmerman to have it disconnected. They will also have someone reach out to the client to return their call.

Did My Team Member Use External Contacts or Queues?
- When transferring a call to another queue, workers must type in the tier and choose the option that comes up under External Contacts. They should not choose the one that comes up under Queues.
- If they choose the one under Queues, no priority is assigned to that call and it will sit there until all calls in the voice queue and the call back queue are answered making it seem like the wait time for that queue is several hours long when it’s really not. Often time these calls do not get answered and the caller abandons or is disconnected.
- To verify if your worker used the correct process or not you can type in “Flow” in the Search for Filters box on Interactions and choose “Internal Transfers”. If the call you are looking for does not come up, they didn’t transfer correctly.
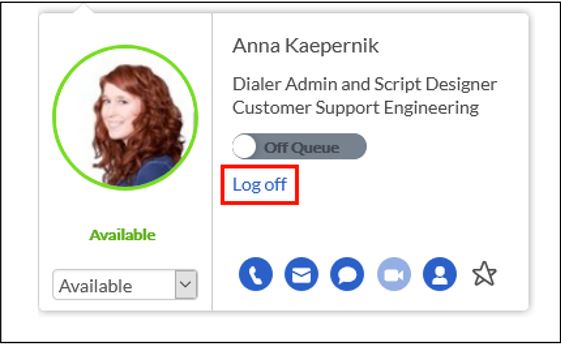
Changing Team Member to Off-Queue
- Follow the Team Member Monitoring instructions above
- Hover over the person’s status dot that is to the left of their name
- Toggle the On-Queue/Off-Queue switch to move them to Off-Queue
- If you need a staff member logged out completed, click Log Off
Alerts #
https://help.mypurecloud.com/articles/alerts/
How to create and manage alerts –
- Performance > Workspace > Create a new tab > Scroll down the left-hand side to alert rules
- In the Alert Rules Workspace, click + to add a new rule alert.

- In the Add New Alert Rule side bar, perform these steps:
-
-
- Name Field: Enter a Name
- Type List: Select the required rule Type
-
- Click ADD, then the configure alert rule Page will open where you name your rule and define the parameters for your alerts.
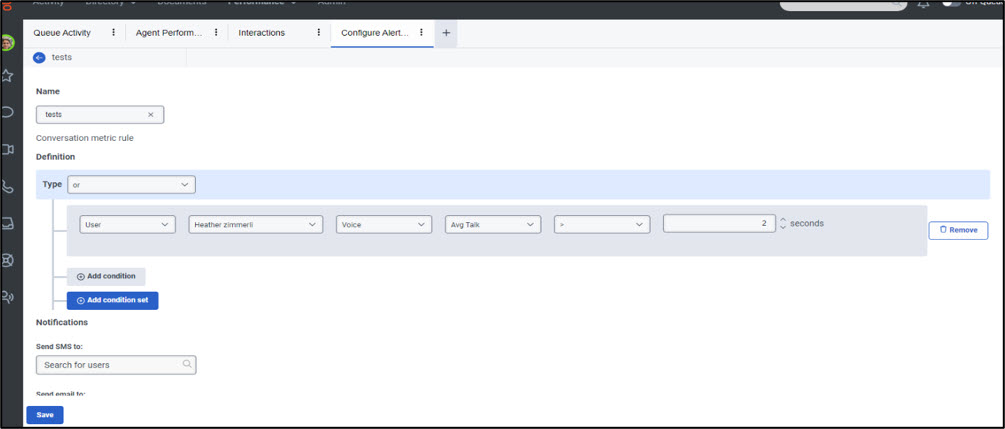
- Select the required definition type, User/Queue/Work Team.
-
- Select the required condition, Enter the threshold number in seconds
-
- Example: You can set up an alert for User for MAX ACW. You would select User, then agent name, voice, MAX ACW > 300 seconds (or 5 minutes).
-
- There is a comprehensive list of all the agent and que variables, and their definitions page: https://help.mypurecloud.com/articles/manage-alert-rules/
- Select how you want to be notified
- Once done, click SAVE
-
- This takes you here:
-
- Select the required condition, Enter the threshold number in seconds
-
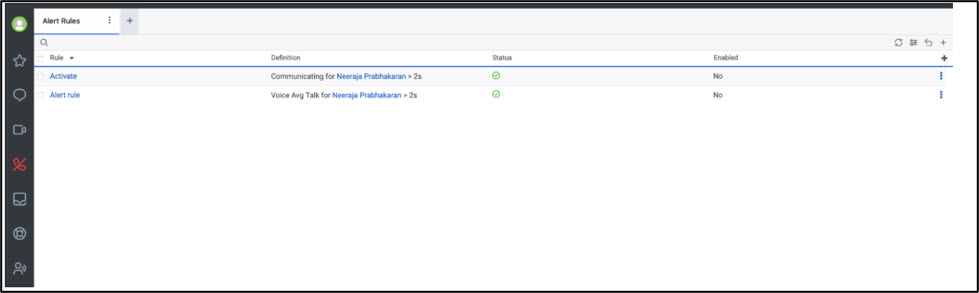
- You then must Enable your alert, on the above screen, click the three dots by the alert, click Enable. You can also disable an alert the same way.
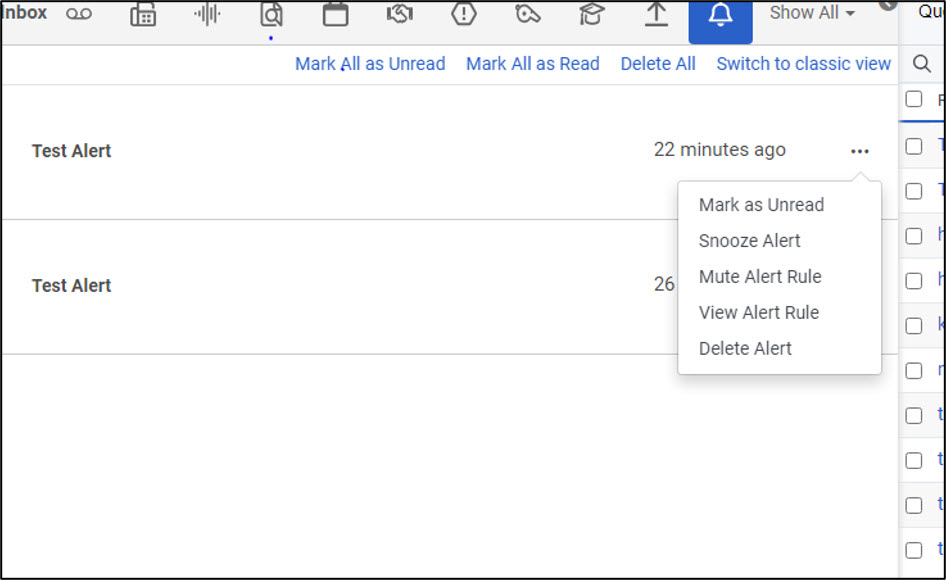
- When an alert is triggered, the notification bell at the top right will have a red number next to it. Clicking on the notification bell takes you to your Genesys inbox. There your alerts will show. From the three dots on this screen, you have the following options:
-
- Mark Read
- Snooze Alert
- Mute Alert
- View Alert
- Delete Alert
-
How Do I Create a Work Team? #
- Admin
- Directory
- Work Teams

- Click New Work Team
![]()
- In the Name box, type the name as it is to appear in views and lists
- In the Division box, select Home and Save.
- Click

- Search for one team member’s name at a time
- When all team members are selected, click Add at the bottom.
- To see this view open a new workspace tab
- Click on Filters and scroll down to see WORK TEAM
- Type in the name of your work team

Is My Team Member in the Correct Status? #
In order to take calls the team member must go “On Queue” if they are not taking call please follow the below directive:
For BPTs:
Everyone will remain in Available status unless one of the following is true:
-
- Sup Approved Time
- CCI Correction
- Email/Memo Time
- Customer Call Back
- Vacation/Sick Leave/Flex Day
- Lunch/Break
- Meeting/Training/Engage
- Technical Issues
For Supervisors:
All supervisors will remain in Available status unless one of the following is true:
-
- Meeting/Training/Engage
- Lunch/Break
- Multi-Supervisor Office (if there are 4 supervisors, all 4 supervisors should not be blitzing, only a few to assist staff)
- Vacation/Sick Leave
- Technical Issues
- Coaching/Assisting staff
Did My Team Member Log Out Correctly?
- Follow the Detail Queue Monitoring steps
- Click on the Status column. A box should pop up that breaks down the number of staff in each type of status. Click “Interacting”
- This will filter the list to staff who are still considered interacting on a live call. If their status shows anything other than “interacting”, they didn’t finish their last call correctly. In the example below, Suzie Smith left for lunch before completing her wrap up correctly.

-
-
- To get more details about the “stuck” call, click the plus sign next to the workers name.
- This will give you the “remote location” of the caller and can be helpful when using the following steps to determine which call is “stuck”. If the person is gone for the day, you can email Tennille Nelson, Richard (Matt) Hampton, Rylea Less, Kia Wright or Heather Zimmerman
- to disconnect the interaction so it stops counting against the worker and the call centers handle time. Supervisors do not have the capability to disconnect an interaction.
-
- To determine if they forgot to choose a wrap up code, go to Performance menu at the very top (not the one in the queue, the one up above on the very top)
- Go to Interactions
- Click on the Filter icon on the far right
- Type in “user” in the Search For Filters search box
- Type in the person’s name in the User search box
- A list of the team members calls will come up.
- There is a plus sign on the far right where you can choose what columns you see. Be sure Wrap Up is one that you see.
- If Wrap Up is blank on an Inbound interaction or an Inbound/Outbound interaction that means the person forgot to choose a wrap up code or forgot to choose Done before they moved on.
- If a wrap up code is selected, chances are they forgot to choose End Callback on a call back call.
Log Out a Team Member
- Performance > Workspace > Agent Status
- Search for the worker
- Hover over their status circle

- Click Log off

- Choose Yes, Log off

- Worker status circle should now be gray
![]()
- Supervisors may have to complete this process up to three times before the log out status will stay.
Did My Team Member End the Interaction Correctly?
- Go to Performance
- Click Workspace
- Click on Agent Statuses on the left
- Click on the magnifying glass in the top left to choose team member to view.
![]()
- Click on the Agent Name
- Click on the Interactions Tab
- Look at the Wrap-Up column on the right. If the wrap up code is missing, the agent did not end the call correctly.
- You can also click on the call; look under Interaction Metrics. If the Duration is still counting, the interaction has not ended.

Team Member Monitoring #
- Go to Performance
- Click Workspace
- Click on Agent Performance on the left
- Click on the magnifying glass in the top left to choose team members to view
- You can save this view by clicking on the Save icon on the far right
- There is a plus sign on the far right that you can choose which columns of data you want to see for your staff, including Secondary Status.
- You are not able to sort by time in state or any other column besides “agent” at this time.
Is the Dialer Finished? #
- Go to Admin
- Campaign Management
- In the example below the Dialer is complete with some calls still being worked on by team members.

-
- In this example, the Dialer is done and no one else is on an active Dialer call.

- Supervisors should not adjust or click on anything in this view as it could result in the list not being finished correctly
Reports #
Genesys is working on depreciating all of their canned reports listed under the Reports menu and moving towards all data being housed in the different Agent Status/Performance views. Below are the steps to get the same data previously obtained from Reports, using the views. The following link provides more details on views. https://help.mypurecloud.com/articles/about-reports-views-and-dashboards/
The columns in each view are customizable by clicking the + sign on the far right of the page
Supervisors can filter by their team or by a specific person by using the Search bar at the top left.
- To search by supervisor team, type in the supervisor name and select the option that says “reports to” next to it instead of “user”. If your full team does not come up or there are people coming up that should not come up for your team, please let Tennille Nelson, Kia Wright and Heather Zimmerman know so they can update Genesys.
All views can be scheduled to run just like the Reports.
Activity Reports
- Agent Activity Summary with Login-Logout, Status Timeline or Status Duration-shows login and log out as well as when they went on queue and shows the status of the agent throughout the day, etc.
- Located in Performance, Workspace, Contact Center and select Agent Status
Agent Reports
- Agent Performance Summary-shows Talk time, ACW and number of calls Handled, etc.
- Located in Performance, Workspace, Contact Center and select Agent Performance
Queue Reports
- Queue Performance Summary with the appropriate time interval selected- shows overall call center numbers and interval data
-
- Located in Performance, Workspace, Contact Center and select Queue Performance
- Each media type must be run as a separate report
-
- Click on the filter and select media type
-
-

-
-
- Click on the Export panel
- Selected columns
- Enter email address if you want to report to go to your email
- Click on Show Advanced Options
- Select Format Durations (HH:MM:SS) and Exclude Empty Rows
- Export & Email
-

- Interaction export- shows all the interactions for the selected filters
-
- Located in Performance, Workspace, Contact and select Agent Performance
-
- Click on the Filter to select columns for the report
- Click on Export panel
- Selected columns
- Enter email address if you want to report to go to your email
- Click on Show Advanced Options (if needed)
- Select Format Durations (HH:MM:SS) and Exclude Empty Rows
- Export & Email
-
- Located in Performance, Workspace, Contact and select Agent Performance
-
- Campaign Performance export
-
- Located in Performance, Workspace, Contact Center and select Interactions
- Select the columns you want on the report by clicking on the on the right
-
- Date, Campaign Start, Total Dialing, Time to Agent, Time to Flow, Time to Abandon, End Date, Duration, DNIS, ANI, Campaign Caller Name, Users-Interacted, Wrap-Up, Total ACW, Contact ID, Contact List, Campaign Name
-
-

-
-
- Click on Export panel
- Selected columns
- Enter email address if you want to report to go to your email
- Click on Show Advanced Options (if needed)
- Select Format Durations (HH:MM:SS)
- Export & Email
-

Below is the link to Genesys Cloud Resource Center to provide directions on which reports to use, what the definitions of each field is, how to run and download a report. Genesys is allowing all previously scheduled reports of a depreciated report run but that will soon be phased out. For new reports that were not previously scheduled, most are not allowed at this time. All will eventually be phased out.
When running a report ensure the Time Zone is set to America/Chicago
Schedule Reports/Views
All views can be scheduled to run just like in Reports. Supervisors can see a list of views that are scheduled by opening a Workspace and choosing Scheduled Exports. Once a view is scheduled, it cannot be edited. If changes need to be made, a whole new scheduled export has to be created.
- Select the columns you want on the report by clicking on the on the right (i.e. Answer, Handle, Avg Handle, Avg ACW)
- Click on the Export panel on the top right
- Check Selected columns
- Enter email address if you want to report to go to your email
- Click on Schedule Export
- Choose how often and when to receive the export
- Click on Show Advanced Options
- Check all available boxes (Format Durations, Split by Media Type, Include Summary Row, etc.)
- Schedule
Call Recording #
The voice part of the call is kept for 60 days before it archives
The screen part of the call is kept for 30 days. The voice part of the call can still be accessed by admins for 10 years. The screen recording is not archived.
How to Listen to a Call
- Performance
- Workspace
- Interactions

- Choose the date at the top
- Click on Filter at the far right

- In the Search for Filter box, type “user” and then in the Search for Users box type the persons name

- Click on the call you want to view (not the check mark box, but anywhere else on that row). This opens the interaction details window.
- The entire call, including the time the caller spent in queue is recorded.
- If you click on Timeline it will show you when the caller was connected to a worker. You can hover over where it says “Interact” in the row with the workers name to see the time of day that part of the conversation happened. Then you can go back up to the top and skip through the call until you find what you need.
- There are pages to each recording, if the screen was recorded it will be on the last page.

- Click on View Screen Recordings to both listen to the call and watch it.
- Both of the workers screens are recorded and will be displayed side by side.
- To focus on one of the workers screens, you can click on that screen and the other will be minimized. The screenshot below is what the call looks like when you first open it with both screens side by side.

- This screen shot is what the recording will look like after the screen with FAMIS open on it is selected. It brings that monitor into focus and puts the monitor that has the Genesys window open on it in the background. You can click back and forth to focus on one screen at a time.

- To go back to viewing the screens side by side, click the blue square at the bottom right.

Live Call Monitoring
- Monitoring allows you to listen to an interaction without disturbing the conversation between the agent and the customer. Neither the customer nor the agent are aware that you’re monitoring the interaction.
- Coaching allows you to drive improvements by offering comments and advice to the agent during the interaction. Customers are not aware of the coaching session and cannot hear your conversation with the agent.
- Genesys Cloud does not notify the agent or customer that you are monitoring them.
- While you are monitoring a call, your name appears in the interaction details as an internal participant with a headset beside your user name.
- To monitor a call, your status must be set to ‘Available’.
To monitor the agent’s in-progress interaction
- Select the team member
- Go to their in-progress interaction
- Under ‘Internal’ select the drop down arrow, then click monitor.

- Once Genesys connects your phone to the interaction, answer your phone to listen to the interaction.
- To stop monitoring, select ‘Stop Monitoring’ next to the name of the agent or customer you’re monitoring.

To coach an Agent during the Interaction
- Under Internal, select the drop down button then select ‘Coach’ next to the agent’s name.
- Genesys connects your phone to the interaction. Answer your phone and coach the agent.
- To stop coaching, select ‘Stop Coaching next to the agent’s name.
Switch between Monitoring and Coaching
If you are monitoring an in-progress interaction and notice the agent struggling to get through a challenging situation. You can stop monitoring, then switch to coaching to coach the agent through the situation.
- Select the toggle button, then hit ‘Stop Monitoring’.
- Select ‘Coach’.

You can switch between monitor and coach as many times as you’d like.
Columns Available on Interactions View
There are lots of fields you can add to your view. Click the + sign on the far right to see a list of available columns. This is where/how you will see if your worker chose a wrap up code at the end of their call or not. You can also add a column for Disconnect type. If the disconnect type says “Agent”, that means the worker disconnected the call. ![]()
Looking Up A Call by Conversation/Interaction ID:
- Similar to Zoom where you had to have a Conversation ID to find a specific recording, you can search by conversation ID in Genesys too.
- Interaction ID and Conversation ID are used interchangeably
- Follow steps 1-4 on How to Listen to a Call above
- In the filter box, type ID and paste the conversation ID (likely received from an email) in the Conversation ID field.
Searching for a Call by Phone Number
- Follow steps 1-4 on How to Listen to a Call above
- In the Search for Filters box type ANI for inbound calls. Calls made by the dialer type DNIS
- Type the phone number into the ANI (for callers who called us) or DNIS(for when we called the caller, such as calls made from the Dialer) box in this format (xxx-xxx-xxxx)
- If the phone number has an interaction tied to it a box will open up with that phone number that you can click.
- Any interactions tied to that phone number will come up.
Date of Call
- If you have Date as an available column to view on your Interactions view, it should be noted the time stamp is not when the worker started interacting with the client. It is the time the time client started interacting with the call center and includes time spent in the call back queue and on hold.
Retrieving an Archived Call
Screen recordings are kept for 30 days and Voice recordings are for 60 days. After Genesys Cloud archives these interactions, you can retrieve them.
- From the interaction’s detail page, in the This Recording Has Been Archived section, click Restore Recording.
- From the drop-down, choose how long you want to keep the restored recording.
- After Genesys Cloud restores the interaction, you can listen to and download the recording.

Speech Analytics and Call Transcription
Genesys offers a speech analytics feature that will transcribe the call (both worker and client side) as well as provide a sentient score based on the caller’s tone which is an indicator of the level of service they are receiving from FSD. Additionally, there are Topics and Events logged based on the transcription that are categorized as either positive or negative. To see the transcript, open the interaction and click on Transcript tab. The events panel will also come up here.

You can search through the transcript using the Search bar at the top of the transcript page to search through the conversation.
If you hover over the topics on the right, it will tell you what transcribed phrase triggered that event. In the example, hovering over the “on hold” event shows the transcribed phrase “one moment” as the trigger.

There are events for Agent Knowledge Gap for when the worker says, “I don’t know” or something similar to help you identify areas where workers may need additional training.
You can search for interactions that have a specific sentiment score by going to:
- Performance
- Workspace
- Interactions
- Content tab

From there you can search for specific users in the filter section on the right

This feature is currently only enabled for Tier 3 calls.
NOTE: Transcription is not a perfect feature. There will be times when the system gets it incorrect. To determine exactly what occurred on a phone call, you will still need to listen to it.
Helpful articles:
- https://help.mypurecloud.com/articles/content-search-view/
- https://help.mypurecloud.com/articles/understand-voice-transcripts/
- https://help.mypurecloud.com/articles/limitations-with-voice-transcription/
- https://help.mypurecloud.com/articles/work-with-sentiment-analysis/
- https://help.mypurecloud.com/articles/understand-sentiment-analysis/
How to Create Dashboards
- Under Performance
- Click Workspace
- Click Dashboards on the left
- In the top right click the plus sign to create a new dashboard
- Name the dashboard and click add
- Click the edit button
 to add what you want to monitor
 - Select the monitoring criteria and users you want to monitor and click save at the bottom.
- Chose to make the dashboard public or private at the top

- You can also add the dashboard to favorites at the top by selecting the yellow star.
***Please note if this does not work open a new tab under workspace and they should show up.
Help article- https://help.mypurecloud.com/articles/performance-dashboards-overview/
Status Definitions #
When viewing a dashboard or queues activity there are several types of statuses workers can be in. Below is a list and what they mean. For a more comprehensive list of metric definitions, see this help article: https://help.mypurecloud.com/articles/metric-definitions/
Type of statuses include: On-Queue, Off-Queue, Offline. On-Queue is when workers are actively taking phone calls or waiting for a phone call to be routed to them. Off-Queue is when workers are not accessible for the queue to route calls to them. Staff can only receive calls in an On-Queue status. Offline means they are not logged in at all.
Worker put themselves in any of the statuses. Supervisors can also put workers in statuses. Genesys will put a user into a specific state when:
Not Responding #
- Genesys has tried to deliver a call to the worker and it didn’t get answered.
#
System Idle #
- Genesys puts workers into the Idle status when they are logged on to the desktop application but the screen saver engages, the screen locks, or the system enters sleep mode because of the workers inactivity. The amount of time it takes for Genesys to change the workers status to Idle depends on the their system settings.
#
Other Statuses #
| Status | Type of Status | Definition | Notes |
| Available | Off-Queue | Worker is logged into Genesys | |
| Away | Off-Queue | Worker has chosen an Away status in Genesys | The only sub-status to this is Technical Issues |
| Break | Off-Queue | Worker is on a 15 minute break | |
| Busy | Off-Queue | There are several secondary statuses associated with Busy. See below for a full list. | |
| Meal | Off-Queue | Worker is on their lunch | |
| Meeting | Off-Queue | When staff are attending an engage, staff, or other type of meeting. | |
| System Away | Off-Queue | See explanation in beginning paragraph | |
| Training | Off-Queue | Worker has chosen the Training status | Training status is also used for Probationary staff working OJT |
| Communicating | On-Queue | Worker is on a non-ACD call. The worker called the client. | |
| Idle | On-Queue | Worker is waiting for system to route a call to them | |
| Interacting | On-Queue | Staff is on a call routed to them from the queue or in wrap up. | |
| Interactions | On-Queue | Staff who are talking with a caller routed to them from the queue. | Does not include staff in wrap up. |
| Not Responding | On-Queue | See explanation in beginning paragraph |
Busy Statuses #
| Status | Intent |
| CCI Correction | When staff need to work on a CCI correction |
| Customer Call Back | When staff have to call someone back. |
| Email/Memo Time | When staff are taking their scheduled email/memo time. |
| Mentor Time | When workers are coaching another staff member. |
| Other Sup Approved | When staff need to work on something not already defined |
| Processing | When staff are working in Current. |
| Supervisor Not Ready | Status for supervisors only to use. |
Who Do I Contact When I Have Issues? #
For any issues with your Genesys, please email fsd.im.genesysteam@dss.mo.gov. DO NOT submit an ITSD ticket unless specifically told to by the Genesys Team.