Log In #
- https://schd-endpoints-ccai-prod.dss.mo.gov
- Login with single sign on.
- If you click on the link and it gives a “failure to fetch” error or “error 39”, copy/paste it into your browser instead. If the copy/past link has anything after the last (ex: https://schd-endpoints-ccai-prod.dss.mo.gov/home or https://schd-endpoints-ccai-prod.dss.mo.gov/calendar),, delete whatever is there and press enter.
- If you get a User Not Authorized error, submit an ASAP requesting access to the Google DSS Appointment Scheduler and the AD Group: FSD-IM-GCP-REP
Bookmarking the Link #
- Bookmark the link
- Go to where you saved the bookmark on your browser
- Right click on the bookmark
- Edit
- In the URL box, remove anything showing after the last backslash
- Save
General Appointment Information #
- Appointments are scheduled on the hour, not the half hour.
- In-person appointments vary by location depending on staffing and lunch hour. The old OARS site was used to determine each RC’s availability.
- Phone appointments are 15 an hour.
- Phone appointments are scheduled between the hours of 9 am and 3 pm.
- In-person appointments are scheduled based on the hours of the previous appointment scheduler.
- Participants can schedule an appointment requesting interpretive services. These appointments will book a 2 hour timeslot.
- Participants requesting an appointment with their local resource center will have the option of going physically into the RC or they can choose to schedule an appointment to be seen virtually. A virtual option is not available for phone appointments.
- Appointments are scheduled based on phone number. The participant’s first name and last name are stored in the scheduling application.
- Individuals cannot schedule more than one appointment with the same phone number if the date of the first appointment has not passed or been cancelled.
- EX: Today is February 20th. I schedule an appointment for Joe on February 21st Later, Joe tries to schedule another appointment for February 22nd using the same phone number that was used to schedule his appointment for the 21st. The scheduler will not allow this. This prevents duplicate appointments being made.
- EX: Today is February 20th. I schedule an appointment for Joe on February 21st Later, Joe cancels the appointment on the 21st and schedules another appointment for February 22nd using the same phone number that was used to schedule his appointment for the 21st. The scheduler will allow this because he cancelled his original appointment.
- EX: Today is February 20th. I schedule an appointment for Joe on February 21st On February 22nd, Joe schedules another appointment for February 24th using the same phone number that was used to schedule his appointment for the 21st. Since the date of his original appointment has passed, the scheduler will allow him to schedule another appointment.
- First name and last name are fields on the calendar and the scheduler does collect that information but it is not required to make an appointment.
How Participants Schedule/Reschedule/Cancel Appointments #
- Participants can schedule appointments via chat or over the phone. Below is the process a participant goes through for each.
- Chat
- Mydss.mo.gov
- Click on the chat
- Choose the appointment schedule option
- Chat

-
-
- Follow the prompts from there
- Over the phone
- 855 373 4636
- Option 7 to reschedule or cancel an existing appointment.
- To make an original appointment, the caller has to be in the queue before they get that option. Once in the queue, the system will tell them how many people are ahead of them and then ask if they would like to schedule an appointment. If the caller presses 1 to schedule, the caller is taken out of the queue and sent to the scheduler.
- Option 7 to reschedule or cancel an existing appointment.
- 855 373 4636
-
Viewing In-Person and Virtual Appointments #
- Click on In-Person
- Select a location
- Click Go
- This brings up a calendar view of appointments.
- Blue indicators mean there is a scheduled appointment
- Yellow means an appointment has been cancelled.
Viewing Phone Appointments #
- Click Telephony
- Click Go
- This brings up a calendar view of appointments.
- Blue indicators mean there is a scheduled appointment
- Yellow means an appointment has been cancelled.
- Click on the day to view the appointments and appointment times
Viewing Scheduled Appointments #
- To see the scheduled times of the appointments for a particular day, click on the day in the calendar, then click on the Day view at the top right.
Viewing the Name and Interpreter Services Needed Indicator #
- In the calendar, click on the day to view the appointments and appointment times.
- Click on the phone number to open the appointment to view the person’s name and if they requested a language interpreter.

How Staff Schedule an Appointment #
- Staff can schedule, cancel or reschedule appointments via the scheduling calendar.
- Click on In-Person for in-person appointments or telephony to for phone call appointments.
- For in-person, choose the location of the appointment and click go
- Click Schedule Appointment at the top
- Enter the person’s name, phone number, program type, if they need an interpreter or not and date and time of the appointment.
- If the appointment date or time is not available an error message will display explaining why the appointment cannot be made for that time (EX: lunch time, outside of business hours, etc.)
- A person HAS to have a phone number. Individuals cannot schedule more than one appointment with the same phone number if the date of the first appointment has not passed or been cancelled.
- When entering the phone number, click the refresh button next to the phone number field to check if that phone number can have an appointment scheduled.
- If the phone number can make an appointment, a green check box will appear. If it can’t a red circle with a line through it will appear. Examples below
- Phone Number Can Make an Appointment

-
-
- Phone Number Cannot Make an Appointment
-

- Click Schedule to schedule the appointment.
- Click Yes to confirm appointment
- Appointment Scheduled Successfully will display at the bottom of the screen
- NOTE: To schedule an appointment, a person must have a phone number. Individuals cannot schedule more than one appointment with the same phone number if the date of the first appointment has not passed or been cancelled.
How Staff Reschedule/Cancel Appointments #
- Click on In-Person for in-person appointments or telephony to for phone call appointments.
- For in-person, choose the location of the appointment and click go
- Find the date of the person’s appointment
- Click on the day, a list of appointments for that day with the phone number and time will display.
- Click the pencil icon to reschedule or click the trash can icon to cancel
Completing In-Person Appointments #
- Staff will need to view the appointment scheduler to see the appointments for the day. Staff will also receive an email alert each time an appointment is scheduled for their office.
- If the participant scheduled a virtual appointment, the Google Meet link will be in the email as well as in the scheduler.
- Staff should assign the appointment they are working on to themselves by clicking the checkbox next to the phone number on the scheduling calendar.
- Example: Someone is working the appointment for phone number (222)222-2222. No one is working appointment for phone number (111)111-1111. The next staff person would need to work the appointment for (111)111-1111

- When participants come in for their appointment, staff can now identify them by their first and last name or the phone number they used to schedule the appointment. See Viewing the Name and Interpreter Service Indicator for directions on how to see the person’s name.
- No Shows: If participants do not come to their scheduled appointment there is nothing that needs to be updated in the scheduling calendar.
Completing Virtual In Person Appointments #
- Staff can access the Google Meet link in two ways:
- In the email notification sent when the appointment was scheduled or
- In the Appointment Scheduler, a blue camera icon will show in the scheduling application.

- At the time of the appointment, staff should click on the blue camera icon from the scheduler OR click on the meet link in the email notification to start the meeting.
- There will be a Sign in option at the top right. Staff should sign in with their state email address. Do not create a personal google account or sign in with your personal google email address.

- Once signed in staff should click on Join Now.
- Once in the Google Meet site staff must enable the microphone and the camera to be able to properly complete the virtual appointment.
- Staff are required to use their camera when completing virtual appointments.
- See the Statewide Lobby SOP for how to handle appointments in Current.
- Once staff are in the meeting, Google Meet will ask staff to allow the customer into the meeting.

-
- Staff should click on View
- The participant will show up under “waiting to be admitted”. Staff should click on Admit

-
- Once staff admit the participant, both worker and participant are in the Meet and the appointment can begin.
- Staff can view a video of these instructions here: Virtual Appointment Recordings-20231005 1424-1
When Participant Does Not Enter Google Meet #
- Staff should allow 5 minutes for the participant to enter the Google Meet room. If the participant has not joined the meeting after 5 minutes, staff should call the participant using their Genesys phone to see if they are having technical difficulties or if they need to reschedule/cancel the appointment. Attempt to resolve their concerns/issues by telephone.
- If the phone calls go to voicemail, staff should follow the same direction as phone appointments listed below under label “If the client does not answer”
- If the client does not enter in the Google Meet Room and cannot be reached by telephone staff should mark the task in
Current – No Contact –
Interpreter Appointments #
- When the participant has scheduled a virtual appointment and needs an interpreter, staff will join the Google Meet as normal.
- To connect to the language line, staff should call the participant and do a conference call with the language line as outlined in the Genesys User Guide.
Completing Phone Appointments #
Staff Instructions #
- Staff will go on-queue at their assigned time in Genesys. Appointment calls can either go into Tier 3 Outbound or the Appointment queue depending on why the person has requested an appointment.
- Go On-queue
When the participant answers:
- Staff should identify themselves with their name and agency name and the reason for calling
- After staff have confirmed they are speaking with the appointment maker, staff will need to identify the caller by following the screening procedures found here.
- It is important staff verify who they are speaking to before releasing any case specific information or updating the case.
- After screening has been successfully completed, staff can proceed with asking what the caller needs and processing the case.
- Staff will not transfer the call to a call center queue (Tier 1, Tier 3, Adult Medicaid). Staff will process the case with the caller on the phone.
- For MAGI/MEDES cases, staff should answer case questions and update address/phone number information. For all other case needs, staff will transfer the call to the contractor for further processing.
If the participant does not answer:
- Voicemail: If staff receive a voicemail, they should use the following verbiage:
- This is (name) with Family Support Division calling for your appointment. I will try to call you again in 5 minutes.”
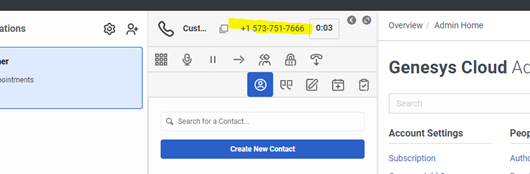
- Before disconnecting the call, staff should highlight the caller’s phone number and copy it so a return call can be made. (See Copying a Caller’s Phone Number Screenshots)
- Staff should make an additional attempt to reach the client 5 minutes after leaving the voicemail.
- If the call goes to voicemail again, staff do not need to leave a second voicemail.
When the call is over:
- If a voicemail was left and worker has to make a call back
- Staff click End Call
- Go Off-queue
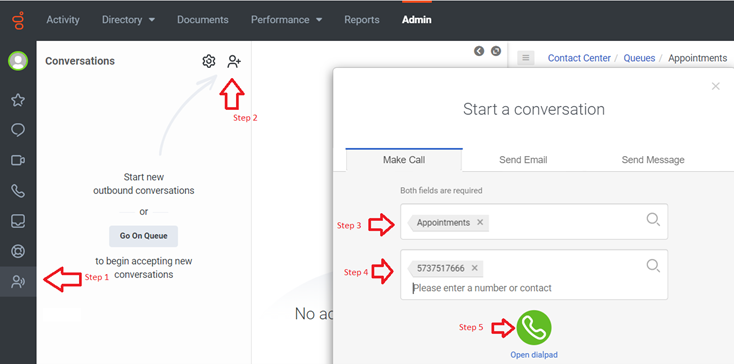
- Staff should make an outbound call using Interactions panel
- Click on interactions icon
- Click on Start a Conversation
- Type in Appointments for the queue
- Type in the phone number to be dialed and press enter
- See Making an Outbound Call for screenshots
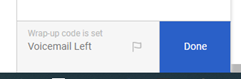
- When the call is over, choose the appropriate wrap up code
- If a second voicemail had to be left, choose Second Voicemail as the wrap up code
- Click Done
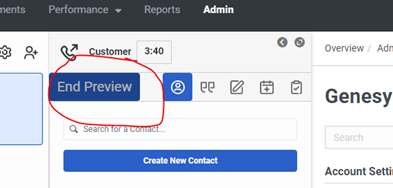
- Click End Preview
If the caller was connected OR a second call was completed that went to voicemail OR caller was not connected for some other reason
- Staff click End Call
- Choose a Wrap Up Code
- Click Done
- Click End Preview
- See Call Back Not Needed for screenshots
- Staff should go into Processing and work Current
Supervisor Instructions #
- Supervisors can see if all the appointment calls have been dialed by going to Admin>Outbound>Campaign Management
- Green checkmarks next to the name of the campaign means the campaign has been completed.
- NOTE: Do not click on anything on this screen. Accidental clicks can completely restart all campaigns including the Predictive Dialer. It is very important not to adjust anything or try to view additional details about any of the campaigns on this screen. If you do happen to make a mistake and click on something, notify FSD.IM.GenesysTeam@dss.mo.gov immediately.
- Supervisors and WMT must work together to ensure all appointments will be completed at the scheduled time.
Copying a Caller’s Phone Number for a Call Back
Call Back Not Needed
- Staff click End Call

- Choose a Wrap Up Code
- Click Done
- Click End Preview
Making an Outbound Interaction
- Don’t forget to choose a wrap up code and click when the call is over.